Many users imagine that you have to be very computer literate to upgrade your computer hardware. This article on memory sticks will prove to you that this is not always the case.
What is RAM
To begin, a quick summary of what random access memory (also called RAM ) is and its usefulness in a computer. RAM can be thought of as a voice for rapid information transition between your storage drive and your processor. When your computer wants to use information, it retrieves it from your hard drive or your SSD drive and stores it temporarily on RAM. The RAM being much faster, will avoid ending up with a fast processor that is constantly waiting for information.
We therefore understand that a larger quantity of memory makes it possible to store more information and therefore accelerate its processing. We have gone from computers with 512 MB of memory not so long ago to racing models with 16 or even 32 GB today. However, most computers today run with 8 GB of RAM, which is more than enough for an average user, on Windows as for Mac. You may need to add one or more memory sticks to speed up the operation of your computer. But it also happens that a strip already installed fails, and it must then be replaced.
The different types of memories
Things would be -too- simple if it were enough to replace an old strip with a new one, faster and with greater capacity. Unfortunately, several generations of memory sticks have followed one another, and your computer can be equipped with SD-RAM memory ( if it is old), DDR (since 2003), DDR2 (since 2005), or much more likely DDR3 (since 2007), or DDR4, the last being the one used on computers since 2015. It is not possible to change the type of memory, firstly because physically a DDR2 strip will not fit into a slot for DDR3 or DDR4, and vice versa. But also because the strips are made to work with certain types of motherboard-processor-connector combinations and not others.
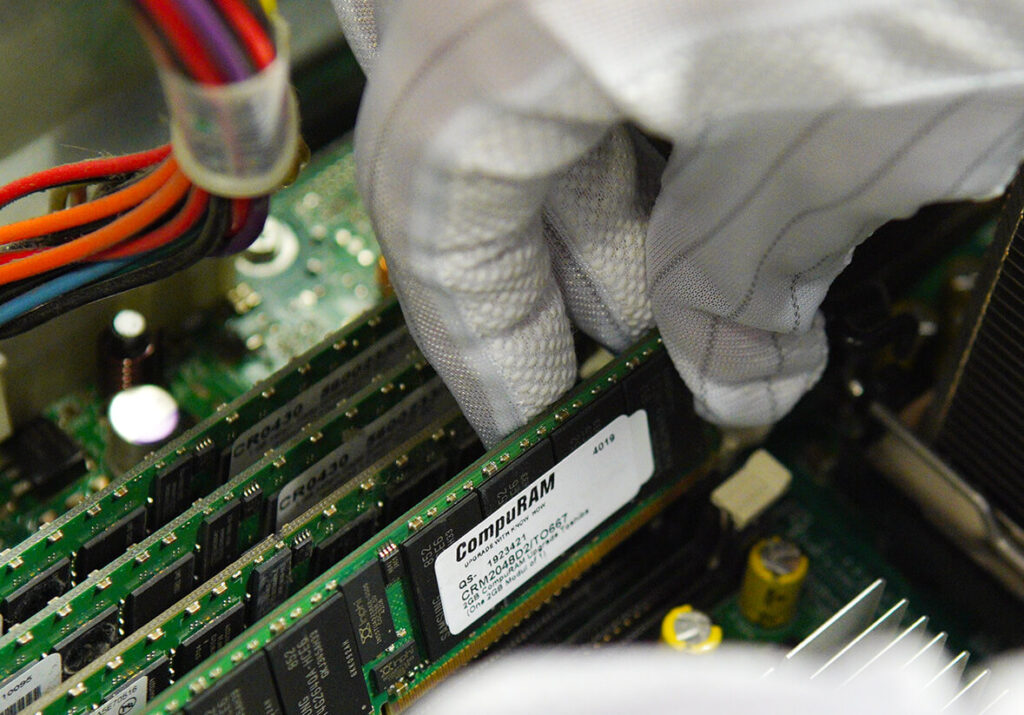
The first thing to do is therefore to identify the type of memory you need, as memories of different types are not compatible with each other. To find out the type of your strips, you first have the solution of opening your computer, taking out a strip by unclipping it and reading the information indicated on the label stuck to it. So, in the visual below, we see that it is a PC 12800 DDR3 memory stick with a capacity of 4 GB (x2 because it is part of an 8 GB kit). You can replace it with another DDR3-type strip, but not with a DDR4.
On the other hand, nothing prevents you from taking a higher capacity strip (within the limit of what is accepted by your motherboard) as long as you stay in the same type. In this example, PC 12800 tells you about the characteristics of your memory and means that this module is intended for use at a frequency of 1600 MHz (i.e. 12800 divided by 8). Please note, it is not obligatory to replace it with a PC 12800 module. You can, for example, replace it with a DDR3 PC 19200 memory module (i.e. frequency of 2400 MHz) but it may be restricted by the limits of your motherboard. , to check before purchasing.
There is also free software that tells you the type of RAM installed on your computer, including the famous – and free – CPU-Z. This software will also tell you the number of slots available on the motherboard. A final solution is simply to go to the manufacturer’s website, which if done correctly, will give you the technical data of your equipment.
Installing your strip
Now that you know the type of your memory, you will be able to acquire and install it. The price of memory sticks, which had fallen considerably in recent years, is tending to rise at the moment due to the shortage of components. But you can still find very good kits at an affordable price. Find out the maximum amount of memory capacity accepted by your motherboard. If possible, avoid mixing brands to avoid compatibility issues.
If your motherboard supports Dual Channels, install identical strips two by two. Dual Channel (2 channels) is a function that uses 2 strips simultaneously for optimized efficiency. On compatible motherboards (almost all today), the slots (locations) for memory strips are often of different colors (in black and blue on the visual below) and you must insert 2 identical strips into 2 slots of the same color.
If this is not the case, do not hesitate to consult the instructions for your motherboard, the manufacturer generally indicates the recommended locations depending on the number and type of strips you wish to install. Dual Channel requires using strips of the same capacity, operating at the same frequency, and preferably from the same brand. Prefer strips from recognized brands such as Crucial, PNY, Corsair, G-Skill, or Kingston rather than strips without brands, called “No Name”, which are often less reliable. Also, study the prices, it is sometimes, and even often, more profitable to acquire one 8 GB strip than two 4 GB ones. Not to mention that this will leave more free slots for a possible addition of RAM on your motherboard in the future.
The first precaution to take, turn off and disconnect your tower from the mains. To access the motherboard, you must unscrew and remove the side panel of your tower. Please note, that opening a branded computer voids the warranty, which should be taken into account before intervention. Do you have any doubts about the correct location to insert your bars? It’s not complicated, the RAM slots are the longest on the motherboard and often also the most colorful. RAM is very sensitive to static electricity which can damage it, so take the precaution of touching a large metal part (for example the power supply of your turned-off PC ) before handling the strip out of its packaging. Needless to say, your hands should also be clean and dry. After having released the fixing tabs on the motherboard, you check the correct direction of the strip by making the notch of the strip coincide with the key which is located on the Dimm location of the motherboard (name of the location for memories), you press until it clicks closed, and there you have it, your strip is installed and blocked by the tabs.
What about laptops?
The principle is the same on a laptop, except for a few details:
– The memory storage is accessed through an unscrewable hatch located at the rear, consult your computer’s instructions to identify it.
– Some manufacturers use a proprietary format that requires you to replace your strips exclusively with identical strips. It is therefore imperative to check your memory type in the same way as for a desktop computer.
– Some laptops do not allow changing or adding memory because the modules are soldered (!) to the motherboard.
– It is necessary to check the number of slots available, sometimes there is only one, and therefore no extension is possible.
– The type of memory is different from that of desktop computers, it is So-Dimm memory, smaller and more stocky in shape. You cannot therefore use laptop memory on a desktop PC, and vice versa.
To conclude, know that adding memory will not work a miracle, in the sense that it will not transform a 10-year-old computer into a state-of-the-art monster for gamers. On the other hand, it will allow you to extend the lifespan and gain more or less significantly in speed on a computer less than 5 years old.